This post will show you how to configure a Raspberry Pi as an Access Point, using Radiusdesk to authenticate the users before allowing them to connect to internet.
Scenario
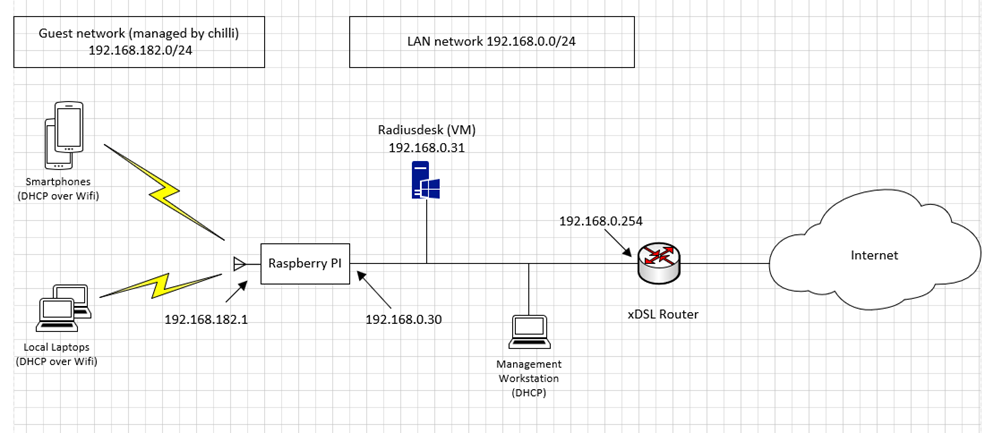
Before starting with the configuration process, we will establish following scenario.
We are working for a company named ACME. This company has been invited to participate to a public exposition and wants to provide a hotspot to its visitors. When the visitors will connect with their smartphones or tablets to the company's WiFi Hotspot, a login page will be automatically presented to them. By clicking on a button, they will be redirected to the home page of the company and have access to the internet for one hour with a maximum bandwidth of 1Mb/s.
Material
The following lists the material needed :
- A raspberry pi (running OpenWrt)
-
A management workstation (running VMware Workstation Pro)
- A virtual machine (running RadiusDesk) on the management workstation
- A xDSL router connecting to the internet
The following schema will give you a better understanding of the actors in presence
Schema
Radiusdesk Installation
The installation of Radiusdesk is pretty easy because we will use the virtual appliance available on this link: https://sourceforge.net/projects/radiusdesk/files/VM-Images/
Download and open the provided .ova file into your favorite virtualization application (I use VMware Workstation PRO). Be aware to configure the network adapters as "Bridged" in order for the Radiusdesk server to be directly accessible on the LAN subnet.

Logon to the console with system/admin
Keyboard configuration
Configure the keyboard to match your locale
dpkg-reconfigure keyboard-configuration
Network configuration
Set a fixed IP address for the Radiusdesk server by editing following file
sudo nano /etc/network/interfaces
And insert the following content
# The primary network interface
auto eth0
iface eth0 inet static
address 192.168.0.31
netmask 255.255.255.0
gateway 192.168.0.254
dns-nameservers 192.168.0.254
Prevent the local coova-chilli service to run
As we won't use the coova-chilli service on the Radiusdesk server, so it's better to disable it.
service chilli stop
systemctl disable chilli
Reboot the virtual machine
You should now be able to access the web interface from the management station by typing following url in a browser : http://192.168.0.31/rd

Login with root/admin
Radiusdesk configuration
To implement our scenario, we will only use a very small part of Radiusdesk. Typically, we won't use Meshdesk at all.
Create a Realm
Start by creating a Real for our organization.
In the Radiusdesk web interface, navigate to Admin – Realms (groups) and click on the "Plus" button to add following realm
- Owner: root
- Name: ACME-company
- Make available to sub-proviers: unchecked
- Suffix: ACME-company
- Add suffix when creating Permanent Users: checked
- Ad suffix when creating Vouchers: checked
- Add suffix when creating BYOD: checked

Validate by clicking "Save" button.
Create a profile
This profile will allow us to limit our visitors to one hour of internet connection with a 1Mb/s bandwidth (see scenario above)
In the Radiusdesk web interface, navigate to Profiles – Profiles and click on the "Plus" sign to add following profile
- Owner: Logged in user
- Name: 1 Hour-BW-1Mbs click to connect

Validate by clicking "Next" button.
Then, edit your freshly created profile by clicking the "Pen" button and adding following component
- Profile component: BW-1Mbps
- Priority: 5

This will restrict our visitors to 1Mb/s bandwidth. Validate with "Ok" button
Add following component using the same method
- Profile component: 1HOUR per MAC daily
- Priority: 3

The new profile is now created

Create a user
Now, we need to create a user and to assign the newly created profile to it.
In the Radiusdesk web interface, navigate to Users – Permanent Users and click on the "Plus" sign and add following User
- Owner: Logged in user
- Username: click_to_connect
- Password: click_to_connect
- Realm: ACME-company
- Profile: 1 HOUR-BW-1Mbs click to connect
- Cap type for time: Hard

Leave the other fields empty for now. Validate by clicking "Next" button.
The new user is now created

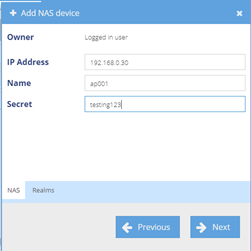
Create a NAS device
This device is actually the Raspberry Pi Access Point that we will configure later on
In the Radiusdesk web interface, navigate to Radius – NAS devices and click on the "Plus" sign to add following device
- Owner: Logged in user
- Fixed Ip: Selected
- Owner: Logged in user

Validate with "Next" button
- IP address: 192.168.0.30
- Name: ap001
- Secret: testing123
Select lower tab "Realms" and assign this NAS device to our organization's Realm
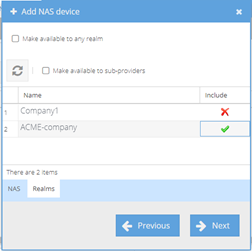
Validate with "Next" button
The NAS device is now created
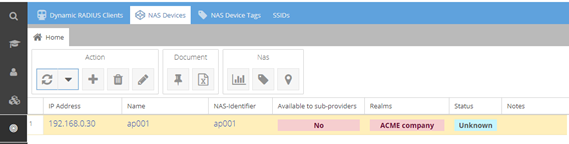
Select the newly created NAS device and edit it by clicking on the "Pen" button.
Then select the lower "Optional info" tab to add following parameters
- NAS identifier: ap001
- Type: coovaChili
- Description: Radius client

Validate with the "Save" button
Then select the lower "Monitoring settings" tab to add following parameters
- Monitor method: ping
- Ping interval: 300
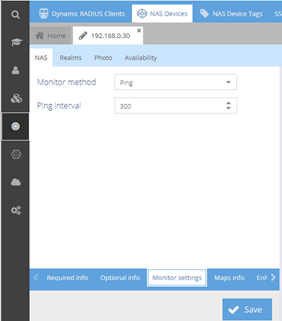
Validate with the "Save" button
Then select the lower "Monitoring settings" tab to add following parameters
- Record authentication requests: checked
- Auto close stale sessions: checked
- Auto close activation time: 600

Validate with the « Save" button
Create a login page
We will now create a dynamic login page for our visitors
In the Radiusdesk web interface, navigate to Other – Dynamic Login Pages and click on the "Plus" sign to add following dynamic page
- Owner: Logged in user
- Name: ACME Login Page

Validate with "Ok" button
The dynamic login page is now created

Select the newly created login page and edit it with the "Pen" button.
Go to "Photo" tab and click the "Plus" button to add an image
- Title: Welcome to ACME Hotspot
- Description: Click on the button below to get one-hour free internet access
- Photo: <path to an image on the management workstation>
- Active: checked

Validate with "Save" button

Now we need to assign the newly created login page to our Raspberry Pi Access Point. This is the tricky part ! We will add the field "nasid" from our NAS device as a dynamic key pair to link it to our dynamic login page.
Select the "Dynamic keys" tab and click the "Plus" button to following key
- Name: nasid
- Value: ap001
- Priority: 1

Validate with the "Save" button
Then, navigate to the "Click to connect" tab to finish the configuration
- Enable: checked
- Connect as: click_to_connect
- Delay before connecting (seconds): 0
- Only click to Connect: checked

Validate with "Save" button. Our Dynamic Login Page is now ready to accept requests.
The Radiusdesk part is done, lets proceed with the configuration of the Raspberry Pi.
Raspberry Pi installation
The prerequisite for this installation is to configure the Rapberry Pi as a routed Access Point as described in my previous post available under this link: https://gremaudpi.emf-informatique.ch/create-a-routed-access-point-with-raspberry-pi-and-openwrt/
Once this is done, you should have a Raspberry Pi running OpenWrt and configured as a routed accesspoint. The SSID visible to the visitors will be "Guest", but you can rename it easily as you want.
The rest of the configuration is mainly based on https://openwrt.org/docs/guide-user/services/captive-portal/wireless.hotspot.coova-chilli
Install coova-chilli
Log on to the raspberry using root/<no password> and install coova-chilli.
opkg update
opkg install coova-chilli
opkg install nano
Stop and disable chilli to avoid lock down
/etc/init.d/chilli stop
/etc/init.d/chilli disable
Configure coova-chilli
Save original config file and recreate one
mv /etc/config/chilli /etc/config/chilli-orig
nano /etc/config/chilli
Paste the following content (the yellow lines are the most relevant for our needs)
#
# Sample Coova-Chilli configuration file modified by gremaudpi
#
config chilli
option interval 3600
option swapoctets 1
######## TUN and DHCP Parameters ########
option tundev 'tun0'
option dhcpif 'wlan0'
option net 192.168.182.0/24
option lease 600
option dns1 8.8.8.8
option dns2 8.8.4.4
option ipup '/etc/chilli/up.sh'
option ipdown '/etc/chilli/down.sh'
######## Radius parameters ########
option radiusserver1 '192.168.0.31'
option radiusserver2 ''
option radiusauthport 1812
option radiussecret 'testing123'
option radiusnasid 'ap001'
option ssid 'ACME-company'
######## Universal access method (UAM) parameters ########
option uamlisten 192.168.182.1
option uamserver 'http://192.168.0.31/cake3/rd_cake/dynamic-details/chilli-browser-detect/'
option uamsecret 'greatsecret'
option uamallowed ''
option uamdomain ''
option uamanydns 1
option uamaliasname 'login'
option nouamsuccess 1
Start chilli
/etc/init.d/chilli start
Verify that chilli loaded our configuration by looking at following file
cat /var/run/chilli*.conf
Test the solution
Verify that our complete solution works by connecting to the hotspot with a WiFi enabled device

You should see our Login Page

By clicking on the "Connectez vous" button, you should see the following screen

By clicking on the "Accès gratuit" button, you should see the following screen
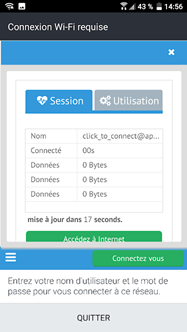
Notice that the name of the connected user is "click_to_connect@ap001"

By clicking to "Accéder à internet" the user is redirected to google
If it works fine, it's time to re-enable coova-chilli on the Raspberry so that it survives reboot.
/etc/init.d/chilli enable
Redirecting users to our homepage
If you want to redirect the user to your homepage, you can go do the following:
In the Radiusdesk web interface, navigate to Other – Dynamic Login Pages and click on the "Pen" sign to modify our Dynamic Login Page. Then, navigate to the upper tab "Setting" and lower tab "Redirect". Change the following parameters:
- Redirect after connect: checked
- Redirect URL: <your home page>
- Show usage: Unchecked
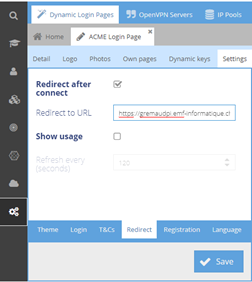
Validate with "Save" button.
Final check
On Radiusdesk, you can now see statistics about your visitors' traffic

And there are plenty of other interesting things to play with …
That's all folks…
Awesome post, very helpful. RadiusDesk lacks very much in detailed and clear setup documentation. I followed your instructions quite a few times and I'm unable to get it working 🙁 When I get to the Dynamic Login Pages it shows 'Hotspot not responding'. Do you see this issue yourself at any time? It may possibly be a bug somewhere as I have checked over and over, including the secrets etc to no avail.
I now have this working. It turns out that the current coova-chilli 1.4-9 package does not work on the latest OpenWrt version! It looks like it has not been compiled with the Json option so will not work with the Dynamic Login pages of RadiusDesk. To get this working, I had to download an earlier coova-chilli 1.3.0 package. Available here https://downloads.openwrt.org/releases/packages/
Thanks for this interreting comment Stephen. I was not aware of this... Regards
Hi, does anyone could make this work? I've stucked because hotspot page is not launching. I've already created the GUEST network, set up radius server and install coovachilli in a router AC1750 (TP-LINK) but it doesn't seem to work...
Any help?